Sunday, November 25, 2012

Christmas Gift Tags

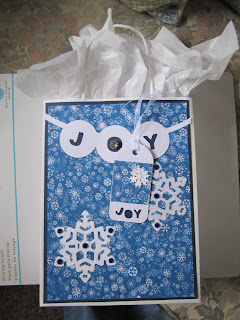
I found some great stickers and embellishments and decided to create some gift tags
and bags.  Here are the results!  I used some sissix dies and a cricut cartridge Christmas Dreams.
Some of the tags have already sold in my shop, but I'm hoping to make more for myself to use for
my gifts.  I think it's so nice to add a personal touch to a gift and these gift bags just came out
so beautiful!  I also used some punches and spellbinders dies for the smaller tags.  I may even
create some tags to hang on my tree this year.  Nothing says Christmas like paper arts!!


Thursday, November 15, 2012

Christmas card using Alcohol Inks

I love to create backgrounds using Ranger alcohol inks.  I decided to run the glossy card I made using some green and butterscotch inks and emboss the piece using an embossing folder.  I then pulled out my Sizzix dies and cut some leaves.  The berries were created using some different shades of red, cranberry and currant inks.  I used my Spellbinders die to create the scallop and Creative Memories to cut the oval.
.


Saturday, October 27, 2012

What to do with an old punch!!

At one time I purchased quite a few punches.  Then all those punches just sat in drawers in my craft room.  I recently pulled out a punch I purchased and came up with an alternative use for the design.
Because I have been creating Christmas cards lately, I was thinking of a Christmas tree and looked at the punch and a light went off!!  Sorry for the lousy picture, my camera broke and I had to scan this card.  Haven't been able to edit the picture better.  I'm going to pull out more punches and think outside of the box.  Can you guess what this punch is ?  It is a Fiskars small hand punch. Great for using for kids cards, but also can be used to create a Christmas tree!!  The thumb is hidden under the layers and I just cut the thumb off when I came to the edge of tree.

I started by die cutting a Christmas tree base from the Create a Critter cartridge.  The reindeer page had a tree which was perfect for my card.  I used green and light green glitter paper from Joann's Fabrics and Crafts.  Then I started punching out lots of hands.  I covered the tree base with adhesive so my hands would stick well.  Starting at the bottom, I layered hand alternating the colors.  I had red and white pearls which worked great as Christmas balls.  I used my embossing folder to creat the white dotted background and found some great snowflake acetate stickers for snowflakes.  I cut a strip of white card stock to create the hill and added a strip of glue and glitter for  some snow.  I popped up my snow bank because I love dimension on my cards.  I just love the way this tree came out.


Wednesday, October 17, 2012

Trying to Create when Grieving

Since my Mom's passing on September 20, 2012 I have been slogging thru the last few weeks.
Grief is indescribable unless you have experienced the pain and sorrow which overwhelms you.
I haven't been able to even step foot into my craft room until a few days ago.  I know doing what I love will help ease the constant thoughts of my Mom's last weeks in the hospital.  Today I am teaching a class which will also help me to get back into some sort of normalcy.  Before my Mom got sick, I decided to play around with the ceramic tiles you can purchase at any home do it yourself store.  I found some black tiles I thought would be great for a Halloween theme.  Hope you enjoy them.


I used paper from Debbie Mum's Harvest and Holiday 8 x 8 paper pack.  I love the glitter which is hard to see in the photos.  I used modge podge and a clear acrylic spray - about 5 coats.  I think next time I will try some clear non yellowing varnish.  I used felt for the backing to prevent the tiles from slipping.  I could also try some cork next time.  (The felt was cheaper).  I am going to start on some Christmas themed tiles next.  Yes - Christmas is only months away.  I am still trying to catch up to fall and Halloween.  Have a great day and don't forget to tell loved ones "I love you"!!

Tuesday, September 4, 2012

Fall is Coming!

Where did the summer go?  I am waiting anxiously for my favorite season - Autumn.  After a long
hot and sticky summer, I am looking forward to some cooler weather.   Turn off the ac and throw
open the windows.  Fall brings to mind pumpkins, leaves, and crisp cool weather.  I created a few
cards with the colors of fall - red, orange, and golds.


I stamped a pumpkin in brown and colored it in with markers.  I used browns and oranges
with this card.

On this card I stamped leaves and added clear emboss.  I cut them out and added some
lovely printed paper. 


Thursday, August 16, 2012

School Days Scrapbook Layout

I really enjoyed doing this double scrapbook page.  I am teaching classes, starting in September, and I'm very excited.  The base and ideas for these two pages, came from one piece of specialty paper from Joann Fabrics and Crafts.  I cut off the pencils for a border and used the composition theme for both pages.  I did a lot of layering on the first layout and I love how everything just flowed.  The bus was from the Autumn Celebrations Cricut cartridge.  The size is 5 inches.  For the school lettering I used the Speaking of School cartridge, and the DAYS was from the Plantin Schoolbook cartridge.  I got the vintage looking school paper at Michaels.


I stamped the small bus on the first page and colored it with markers.  I love using primary colors for a school layout.  Kids love bright colors and I thought this would be a fun scrapbook layout for them to place their school pictures.  Here are a few closes up pictures.  The chrome on the bus is colored with a silver paint pen I had.  I love to add those special little details.  The lights of the bus are buttons.
Hope you all enjoy this layout and just comment if you have any questions or thoughts.


Monday, July 30, 2012

Scrapbook Layout - Halloween

Halloween Layout

I am very excited to start teaching classes at Joann Fabrics and Crafts beginning in September.  Although I am a card maker, I also like to scrapbook.  I made the following 2 page layout using the Happy Hauntings Cricut cartridge.  I cut the fence and graveyard gate at 5 inches.  I had fun distressing the fence and gate with silver pigment ink using a large distress stamp I have.  I also used Ranger distress inks on the pumpkins.  The paper is from DCWV Halloween & Fall pack along with the stickers.


Monday, July 16, 2012

Craft Show Displays - Old into New

One of my favorite haunts is the local Goodwill.  On a recent trip I was scouting for ideas for my craft display tables. I wanted some new props to catch my customers attention.  I found a bulletin board for .99, and a cookie sheet for the same price.  I've been wanting to either purchase a banner or come up with an attractive alternative.  I purchased some spray paint and a couple metal easels from my local JoAnn's store.  Of course, I used my coupons.  So for a grand total of under $20.00 I had some wonderful and unique new displays for my craft tables.


 I used my 12 x 12 paper and my Spellbinder's scallop die cuts.  The letters are made using the Jasmine Cricut cartridge.  Another alternative would be to use sheets of vinyl - also for sale at Joann's.
Now I have a great purple sign which perfectly reflects my company Lilac Cottage Cards.  The cookie sheet holds my glass magnets securely and my customers can see everything at eye level.


 I love this Rust-oleum spray paint.  I used two coats and had a nice satin finish on both the metal cookie sheet and the pressed wood bulletin board.
I also used it on a wire basket and the finish was even with no drips.

 We had a rainy day at the market, so I wasn't able to get pictures of my craft space, but I will be posting those pictures this weekend.  So stay tuned.  I have some other craft display ideas in the works.


Friday, June 22, 2012

Large Image Stamps

I decided to grab a few stamps that have large images and make them the focal point of the card.  Sometimes I'm a little intimidated by a large image stamp, because I'm not sure how to incorporate it into a card.  Do I add a background or not?  Balancing a large image with other elements on the card is not always easy for me.  Since summer has officially started, I decided to go with some beach themed stamps.  I stamped the large starfish after I pulled out some aqua color ink.  I love the combo of brown & aqua.  After I put the card together, I decided to stamp and emboss the greeting because there was too much empty space on the card.  I really like how the card balanced out so well.

On the next card I used a large fish stamp I've had for years, but had never used.  I first stamped the image with a light orange chalk ink on a orange card stock.  Then I decided to stamp the image with white pigment ink and emboss with white embossing powder.  I think it really pops more.  Because the image is so large, I decided to go with a small sentiment .  I used a large pearl for the eye.  I then added a strip of bright blue paper.


Tuesday, June 19, 2012

What to do with all Those Scraps

Like most papercrafters, I have a lot of scraps of paper.  After awhile, I seem to accumulate quite a lot of leftover embellishments, stamped items, etc.  So today I pulled out my pile of leftovers, and challenged myself to make some cards.  On the first card I found a piece of kraft paper, 2 yellow die cut flowers, a white piece of punched trim and a strip of brown paper.  All very blah - so I decided to pull out the ink and stamps.  First, I stamped the large kraft piece with an distress stamp with walnut distress ink.  Then I pulled out a stamp that has elegant lettering and I stamped the flowers.  I then used a decorate scroll to stamp the brown strip of card stock.  Finally, I took the white trim and inked it up with frayed burlap and old paper distress inks.  The center of the flowers were leftover from flowers I punched from coffee cup holders!  They fit just perfect.

On the next card I began with the embossed dragonfly.  I sometimes stamp something, and for whatever reason I decide not to use it.  But I hate throwing any stamped piece out!  I trimmed the dragonfly and then found the scrap piece of tiny flowered print paper.  The purples matched nicely.  Lastly, I had another piece of trim.  I sometimes punch a large piece of trim and don't use it all.  Nothing goes to waste.  I added a purple ribbon and tiny purple rhinestones to give the card a little pizazz.
The last card I did was created when I found a stamped Buddha already cut and the Happy Birthday O' Ancient One also stamped and cut.  I just added a piece of Asian themed paper for the background.
I even found a oriental coin embellishment in my scrap box. (Not shown in picture).  I think the key to using up your scraps to create a great card is to find like components and colors.  I can't wait to try this again. 

So check out your scraps and leftovers and see what you can come up with.  There really is great satisfaction in creating a new card from pieces of leftover scraps of paper and stamped images.  I think I'll try to do this one a month, and keep my scrap pile from growing too large!

Monday, June 18, 2012

Old Crafts in New Ways


I decided to pull out some old Plaid stencils I had in the basement.  My challenge to myself today, was to create some new cards using stencils, both plastic and brass.  I like using other craft tools in different ways.  So first I decided to use the sun stencil and create a background.  I mixed yellow and orange inks together using makeup sponges.  I lightly pounced the stencil and came up with a beautiful background.  Next, I thought I'd do a card for a child using the frog stencil.  I used a few different color green inks. On my third card I thought I'd use some southwest color inks.  I inked the lizard and then cut it out.  And finally, on my 4th card I dry embossed the seahorse and then used the brass stencil and inked the seahorse so it would stand out.


Monday, March 12, 2012

Spring is nearly here.  Our daffodils are in bloom.  I sat outside today with my favorite stamping magazine and enjoyed this warm and gorgeous weather.  My neighborhood consists of McMansions and old farm houses.  On my walk today, I passed a house that had a 1785 historic marker.  We live on a boxwood farm. There's lots of land and lots of woods.  When the leaves all bloom, we won't be able to see another house.

I've been energized with this change of seasons approaching and have been making all kinds of cards.
I found some paper and embellishments which sparked a flood of card making ideas.  I'll post some of my latest cards and also some of what I call home.  Hope you enjoy the week and the upcoming Spring season!


Wednesday, February 15, 2012

Stepping outside of the Box

I decided to do a Valentine home decor project.  My local craft store had a sale on wood letters so I purchased LOVE.  Since I have so many scraps of paper, I'm always trying to come up with ways to use the leftovers.  The letters were already painted white, so I decided just to decoupage on some paper.
I pulled a few pieces of scraps that coordinated well together, and started tracing and cutting. Next time I would not decoupage all the way around the letters.  Very time consuming.  But I love the end result which now sits on my mantel above our fireplace.


Tuesday, January 31, 2012

Love Dollar Items!!

Like so many of us these days, I love a good buy.  One of my favorite places to look is the dollar bins in most of the craft stores in my area.  I found some cute stamps just $1.00 each.  Before I buy a stamp, I usually have an idea of what I'll be creating.  I like doing kids cards and my last set sold in 2 days!!
Another good deal I found recently is with Michaels Craft Store.  I buy bulk in some items, and now they offer a discount for items purchased in larger quantities.  I just got a lot of kraft paper and stickers I use in my top selling checkbook cover.  I saved nearly $20!!

I don't usually include instructions on my cards, but if anyone would like details,I would be glad to provide them.  The cards I did today were made with the kraft paper and new stamps I bought.
Hope you enjoy them.